Tuesday 9 July 2013

Windows 7: Add WindowsSideBar Gadget (Customized)

Location is:  from the search box ... type shell:gadgets and click on the folder icon at the top of the results..
C:\User\Name\AppData\Local\Microsoft\WindowsSidebar\Gadgets


Gadgets are small applications that are based on a platform of XML, HTML, CSS & Script (e.g. JS),  that provide the ability to derive and present information or functionality from a variety of sources, such as local applications and controls, or Web sites and services.
If you have some knowledge about HTML then you can easily create your own Gadget. In this article i’m going to describe that.
A basic Gadget consists mainly two files:
  • A XML file, named gadget.xml – contains general configuration and presentation information for the gadget.
  • An HTML page, say myGadget.html – contains the core functionality for the gadget.
We can use CSS & Script within the HTML file or we can create those separately and include them to main HTML file in ‘<head>’ tag.
The following is a step-by-step example for creating a simple “CountIt!” gadget (developed by me) that help you to quickly determine the number of words and characters contained in any phrase.
OK, let’s start step-by-step:
  1. Create a new folder on your desktop and name it CountIt.gadget
  2. Open ‘CountIt.gadget’ folder and create three sub folder (css, js, images) & two files (gadget.xml, countit.html) in that folder. Note: Sub folder creation optional If you want to keep the .css, .js and images separately then create those sub folders.
    Here’s the XML file (called a manifest):
    gadget.xml
    <?xml version="1.0" encoding="utf-8"?>
    <gadget>
    <name>CountIt!</name>
    <namespace>microsoft.windows</namespace>
    <version>1.0.0.0</version>
    <author name="Mahbubul Alam">
    <info url="http://mashreky.wordpress.com" text="www.mashreky.wordpress.com"/>
    <logo src="logo.png"/>
    </author>
    <copyright>© 2010</copyright>
    <description>Word and character counting tool that help you to quickly determine the number of words and characters contained in any phrase.</description>
    <icons>
    <icon height="48" width="48" src="icon.png"/>
    </icons>
    <hosts>
    <host name="sidebar">
    <autoscaleDPI>true</autoscaleDPI>
    <base type="HTML" apiVersion="1.0.0" src="countit.html"/>
    <permissions>Full</permissions>
    <platform minPlatformVersion="1.0"/>
    <defaultImage src="drag.png"/>
    </host>
    </hosts>
    </gadget>
    The above XML will look like this in the Windows Gadget menu after install the gadget:
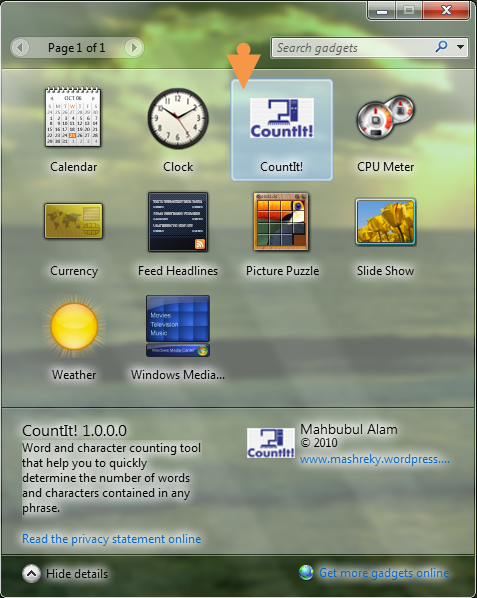
    CountIt!
    Here’s the HTML file:
    countit.html
    <html>
    <head>
    <title>CountIt</title>
    <meta http-equiv="MSThemeCompatible" content="yes">
    <meta http-equiv="Content-Type" content="text/html; charset=UTF-8">
    <link href="css/countit.css" rel="stylesheet" type="text/css" />
    <script src="js/countit.js" type="text/javascript" language="javascript"></script>
    <script type="text/javascript" language="javascript">
    function init()
    {
    var gBackground = document.getElementById("gadgetBg");
    gBackground.src = "url(images/bg.png)";
    }
    </script>
    </head>
    <body dir="ltr" scroll="no" unselectable="on" onload="init()">
    <g:background id="gadgetBg">
    <div>
    <form name="wcount" method="post">
    <span>Copy & Paste your text here.</span>
    <input type="text" name="txtCount" id="txtCount" size="29" /> = <input type="text" name="txtCountShow" id="txtCountShow" size="2" /><br /><br />
    <div>
    <input type="button" value="Characters?" onClick="charcount(txtCount)" />
    <input type="button" value="Words?" onClick="wordcount(txtCount)" />
    <input type="button" value="Clear" onClick="onBtnClearClick()" />
    &nbsp;&nbsp;<a href="http://mashreky.wordpress.com"><img src="images/logo.png" alt="CountIt! Help you to quickly determine the number of words and characters contained in any phrase." /></a>
    </div>
    </form>
    </div>
    </g:background>
    </body>
    </html>
    In my HTML, CSS, JS and some images are used. Here i’m giving the CSS & JS code. But in regards of images, please create your own or just remove the image related code from the HTML file.
    Now, create a CSS file into css sub folder, say countit.css.
    Here’s the CSS file:
    countit.css
    body
    {
    width: 260px;
    height: 80px;
    font:10px segoe ui,tahoma;
    color:black;
    margin:0;
    border:2px outset gray;
    cursor:default;
    }
    input
    {font:12px segoe ui,tahoma;}
    img
    {border:0;}
    .paddingLft5
    {padding-left:5px;}
    .paddingLft0
    {padding-left:0px;}
    .spanTxt
    {
    font:11px segoe ui,tahoma;
    font-weight:bold;
    color:#ffffff;
    }
    .margintop5
    {margin-top:-7px;}
    Now, create a JS file into js sub folder, say countit.js.
    Here’s the JS file:
    countit.js
    // JavaScript Document

    function wordcount(ctrl)
    {
    var text = ctrl.value;
    text = text.split(" ");
    count = 0;
    for(i=0; i<text.length; i++)
    {
    if (text[i].length > 0)
    count++;
    }
    document.wcount.txtCountShow.value = count;
    }
    function charcount(ctrl)
    {
    document.wcount.txtCountShow.value = ctrl.value.length;
    }
    function onBtnClearClick()
    {
    document.wcount.txtCount.value = "";
    document.wcount.txtCountShow.value = "";
    }
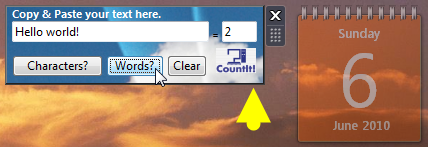
    The CountIt! gadget will look like this:
  3. Now, Select all the contents of Countit.gadget folder, right-click and choose Send To > Compressed (Zipped) Folder. After complete just remove ZIP (.zip) file extension and you’re done!
    Note: do not ZIP the containing folder for your gadget, just its contents (css, js, images folder, gadget.xml and countit.html files etc).
  4. Now, just click on the Countit.gadget, Windows will install the gadget in your PC.
Enjoy!

Creating a gadget for Windows 7

By Janae AllenJune 26, 2009
In this blog post, I will discuss the steps needed to create a basic gadget in Windows 7. A gadget consists of XML, HTML, and CSS files. I will create a gadget that will use rssxpress-lite to display an RSS feed straight to the desktop.
1. Create the gadget directory
I created a directory to hold my gadget files in c:\Program Files\Windows Sidebar\Gadgets.  It's best practice for the directory name to be the same as the name of the gadget, along with the .Gadget extension. For example, I will name my gadget SampleGadget, so my gadget directory will be named SampleGadget.Gadget.
2. Create the manifest - gadget.xml
The manifest is an XML file that contains the basic information about the gadget, such as the name, version, and permissions. 
Above is a very simple manifest.  I have specified the name (SampleGadget), the version, and then a few bits of specific information about this gadget. Be sure to save this file as type UTF-8. For more information about the gadget manifest and additional properties, visit Gadgets for Windows Sidebar Manifest.
3. Create the base HTML file - SampleGadget.html
This HTML file is the main one used to display the gadget and also contains the CSS used for styling. It's location is specified in the <base> tag of the manifest XML file (gadget.xml).  Since my gadget is utilizing a 3rd party component, I only have a few lines of code besides the CSS:
This file should be saved as type Unicode.  I set a specific height on my gadget so that large amounts of content wouldn't cover a large area on the desktop. I also specified that a scrollbar should show if the content will expand past the set height of the gadget.  The CSS styles starting with '.rss' are specific to the 3rd party RSS functionality I am using.
4. Installing the gadget
If you saved your gadget files into the windows gadget directory, installation of the gadget should be simple.  Go to the Windows 7 desktop, right-click and select 'Gadgets'.  The new gadget (SampleGadget) should be listed in the available gadgets.  Double-click the gadget to install it.
5. Adding settings
Configuring a Settings dialog for your gadget is a way to allow the user to customize the gadget to a user's personal preferences.  For this example, we need three files: SampleGadget.js, Settings.js and Settings.html.
SampleGadget.js should contain the following two lines of code to refer to the HTML page that will format the settings dialog:
Settings.html will contain the html code needed to display the settings dialog.  For my gadget, I only needed one text box where the user would specify the URL to the feed they wish to display:


The Settings dialog for my sample gadget looks like this:

The Settings.js and SampleGadget.js will contain the code needed to save the user input in the Settings dialog, and use those settings to update the gadget. For more information about setting up Settings for your gadget, visitDeveloping a Gadget for Windows Sidebar Part 3: Settings and Flyouts.
See also my post about the Gadgets Platform.

Windows 7: Active Desktop page Setup

Windows 7: Display computer name in Logon Screen

Windows 7: Adding messages to Windows 7's logon screen

I know that if you open a command prompt and type:
echo %computername% it will show the computer's current name.

Adding messages to Windows 7's logon screen

Takeaway: With a few simple registry tweaks, you can customize the Windows 7 logon screen to include a warning message and logon statistics. This illustrated walk-through shows you how.

If you are responsible for managing Windows 7 systems that are open to the public or have multiple user accounts, you may want to add a warning message to the logon screen. You may also want to display logon statistics on the logon screen. Fortunately, doing so is easily accomplished by tweaking a couple of existing registry settings and adding a new setting.
In this edition of the Windows Desktop Report, I’ll show you how to delve into Windows 7’s registry to make the appropriate changes.

Editing the registry

It is important to keep in mind that the registry is vital to the operating system and changing it can be dangerous if you inadvertently make a mistake. As such, you should take a few moments to back up your system by creating a Restore Point as well as by creating a system image in the Backup and Restore tool. That way if anything goes awry, you can restore your system and get right back to work.
To launch the Registry Editor, click the Start button, type Regedit in the Start Search box, and press [Enter]. When the UAC dialog box appears, respond appropriately.

Getting started

Once the Registry Editor launches, locate the following key:
HKEY_LOCAL_MACHINE\SOFTWARE\Microsoft\Windows\CurrentVersion\Policies\System
From this key, shown in Figure A, you’ll be able to make all the following changes to the Logon screen.

Figure A

From this key, you’ll be able to make all the necessary changes to the Logon screen.

The warning message

The warning message that you’ll add to the Windows 7’s logon screen is actually made up of two parts: the title and the message text.
To add a title to the warning message, locate and double-click the legalnoticecaption value. When the Edit DWORD dialog box appears, type the title in the Value data text box, as shown in Figure B, and click OK. As you can see, for my example I chose to use a Welcome message, but you can essentially type anything that you want for your title. You can use up to 80 characters, including spaces, for the title.

Figure B

The legalnoticecaption value allows you to specify a title for your warning message.
To add the warning message, locate and double-click the legalnoticetext value. When the Edit DWORD dialog box appears, type the warning message in the Value data text box, as shown inFigure C, and click OK. As you can see, for my example, I chose to remind users of the rules in the lab. Again, you can essentially type anything that you want for your message text. You can use up to 16,383 characters, including spaces, for the message text. However, I have never needed to use that many characters for my messages.

Figure C

You can type a lot of text into the legalnoticetext value.

Tracking logons

If you want to be able to keep track of logons that were made on your system, you can configure the Logon screen to display logon statistics. Right-click anywhere inside the System key and select New| DWORD (32-bit) Value. When the new value appears, type DisplayLastLogonInfo and press Enter twice. When the Edit DWORD dialog box appears, simply type a 1 in the Value Data text box, as shown in Figure D, and click OK.

Figure D

If you want to be able to keep track of logons that were made on your system, set theDisplayLastLogonInfo value to 1.

The new logon display

Now when you restart your system and access the logon screen, you’ll see the warning message, as shown in Figure E. Just click OK and you’ll see your user icon and be able to continue with the logon operation.

Figure E

The warning message will appear on top of the logon screen.
When you select your user icon on the logon screen and type your password, you’ll see the logon statistics, as shown in Figure F. Just click OK to complete the logon operation, and you will immediately see the desktop as you normally would.

Figure F

After you click your user icon, you’ll see the logon statistics on the logon screen.

Windows 7: Configure the Welcome Screen and Classic Logon Screen

Understand and Configure the Welcome Screen and Classic Logon Screen


By default, Windows 7 displays a Welcome screen when a computer is part of a homegroup or workgroup and it displays a Logon screen when a computer is part of a domain.


The Welcome screen provides a list of accounts on the computer. To log on with one of these accounts, you click the account and type a password (if one is required). Note that the Welcome screen does not display all the accounts that have been created on the computer. Some accounts, such as Administrator, are hidden from view. The Welcome screen is convenient because it displays a list of available accounts. But to enhance security in a homegroup or workgroup, you can use the Logon screen instead of the Welcome screen—therefore not displaying a list of accounts.

The Logon screen requires users to type a logon name rather than selecting an account from a list of available accounts. The Logon screen has several features that you can control. By default, the name of the last user to log on is displayed in the User Name field of the Log On To Windows dialog box. You can improve security by hiding the user name of the last user to log on. Instead, users will need to know a valid account name for the computer. To do this, start the Local Security Policy tool from the Administrative Tools menu or type secpol.msc at an elevated command prompt. Then, under Local Policies\Security Options, double-click Interactive Logon: Do Not Display Last User Name. Click Enabled, and then click OK.

You can configure whether the Welcome screen is used through the Always Use Classic Logon setting in Group Policy. For this, you have the following options:
  • Enable the policy to use the Logon screen rather than the Welcome screen.
  • Disable the policy to use the Welcome screen.
  • Use Not Configured to use the default configuration (the Welcome screen).

In a domain environment, you can use Active Directory-based Group Policy to apply the security configuration you want to a particular set of computers. You can also configure this setting on a per-computer basis by using local security policy. To configure a homegroup or workgroup computer to use the Logon screen rather than the Welcome screen, use the Group Policy Object Editor, which is an MMC snap-in. You can add this snap-in to an empty console and configure a computer to use the Logon screen by following these steps:
1. Click Start, type gpedit.msc, and then press Enter. This opens the Local Group Policy Editor with the top-level Local Group Policy object open for editing.
2. In the editor, expand Local Computer Policy, Computer Configuration, Administrative Templates, System, Logon.
3. Double-click Always Use Classic Logon.
4. Select Enabled, and then click OK.

In a domain, by default users are required to press Ctrl+Alt+Del to access the Log On To Windows dialog box. You can eliminate this requirement, but it is a poor security practice. To do so, in the Local Security Policy tool, expand Local Policies\Security Options, and then double-click Interactive Logon: Do Not Require Ctrl+Alt+Del. Click Enabled, and then click OK. But, we do not advise disabling this option. 

Wednesday 3 July 2013

Windows 7: Disable Remote shutdown command

In case you want to get rid these shutdown initiated by administrators on your network to which your computer is connected. You will need to remove rights for administrators to shutdown your computer locally – but this will work only if they don’t have any server group policy applied on the network.
1. Open Start Menu >> Run and type secpol.msc and press Enter
2. Navigate to Local Polices >> User Rights Assignments and select
Force shutdown from a remote system
disable-remote-shutdown
3. Double click the selected entry, you will see another windows to modify this policy rule
force-shutdown-remote-system
4. Select Administrators and click remove and press Ok,
5. That’s it, now on the network to which your computer is connected no one can remote shutdown on your computer


Step 1:

  1. Control panel-->Administrative tools-->Local/Domain Security Policy-->Local Policies -> User Rights Assignment -> Shutdown the System.
    • Add a local user who will be able to shutdown the computer
    • Remove all other users
Step 2:
1.
For Windows 7 / Vista: Go to Start, in the Start Search type gpedit.msc and click Enter.
1
2. Write gpedit.msc in RUN Command.
2
3. Group Policy window will pop up from which choose User Configuration > Administrative Templates > Start Menu & Taskbar from the Left Panel as shown below.
4
4. Now on the Right Panel, double-click on Remove And Prevent Access To Shut Down Command.
5
5.A pop will appear set it to Enabled. Then you’ll notice that this will remove the shutdown option from the Start Menu and security dialog box. Now the system can be shutdown via the command prompt only.
6

6. Disable Shutdown From Command Prompt

Finally, you need to prevent people from going to the command prompt and simply typing in Shutdown.To do this here is the simple method.
Use Similar method as above but this time navigate to User Configuration > Administrative Templates > System from the left menu and double-click on the Prevent Access To The Command Prompt policy from right pane and set it to Enabled.
9